Không biết tại sao bài bị xoá, đăng lại link pdf cho ai cần
http://www.mediafire.com/file/r37ylhmk7wsb0a4
Link gốc bài bị xoá không rõ nguyên nhân:
https://tinhte.vn/threads/cai-postmarketos-len-nexus-7-2012-16gb.3113099/?_xfNoRedirect=1#post-56448223
Link image trên Google drive:
kernel-6.x https://drive.google.com/drive/u/2/folders/1G8jLjee1FZq0UQ76hRX8_vMnOnl5KXH4
kernel-5.17.0 https://drive.google.com/drive/u/0/folders/1B27V9Od0g4pvKfWRIhK_CnJFXG8VCcXK
pmOS-asus-grouper - Google Drive
drive.google.com
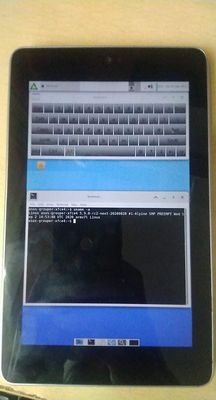
Default user: user
Default passwd: 147147
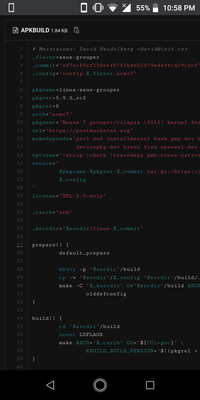
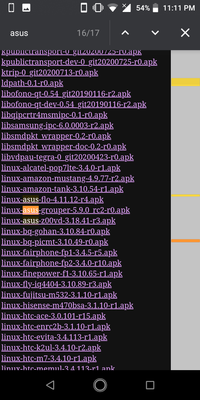
Trang devs của postmarketOS/pmaports, kernel grouper đã lên 6.1, 6.0.6, 5.19.0-rc8, 5.17.0 và 5.15.0-rc4-next-postmarketos-grate mainline
Kernel 6.1
https://gitlab.com/clamor95/pmaports/-/commit/748f4ef2a071826e45b5f301040f7087a36ae3e0
Kermel 6.0.6
https://gitlab.com/postmarketOS/pmaports/-/tree/master/device/testing/linux-postmarketos-grate
https://wiki.postmarketos.org/wiki/Google_Nexus_7_2012_(asus-grouper)

Google Nexus 7 2012 (asus-grouper) - postmarketOS Wiki
wiki.postmarketos.org
Quảng cáo
Cài TWRP for grouper 3.3.1-0 trở lên https://dl.twrp.me/grouper/
Download TWRP for grouper
Download TWRP Open Recovery for grouper
dl.twrp.me
Cách kiểm tra Nexus 7 2012 là mã cũ PM269 hay E1565
Variants
- grouper rev. PM269 - without GSM (oldest)
- grouper rev. E1565 - without GSM (modern revision)
- tilapia rev. E1565 - with GSM
Do I have grouper or tilapia?
TWRP (adb shell) $ grep androidboot.baseband=unknown /proc/cmdline && echo grouper || echo tilapia
Which hardware revision of grouper do I have?
TWRP (adb shell) $ find /sys/devices/ | grep -c max776 && echo You have E1565
Quảng cáo
TWRP (adb shell) $ find /sys/devices/ | grep -c tps6591 && echo You have PM269
Để PC nhận Nexus 7 2012 và flash kernel và push rootfs nhanh thì nên rút hết các thiết bị usb khác ngoài Nexus 7
Build image from pmbootstrap on PC/Laptop:
# sudo apk add pmbootstrap python3 coreutils procps git android-tools
# pmbootstrap init
Channel []: edge
Vendor []: asus
Device codename []: grouper
Kernel []: e1565-mainline
Enable this package? (y/n) [y]: y
Username []: user
User interface []: xfce4 ← hoặc phosh thì đổi ở đây
Extra packages []: nano,thunar,xvkbd,matchbox-keyboard
Choose default locale installation [en_US.UTF-8]: en_US.UTF-8
Device hostname (short form, e.g ‘foo’) []: asus-grouper-xfce4
Build outdate packages during ‘pmbootstrap install’? (y/n) [y]: y
# pmbootstrap status
Trước khi build image thì chroot vào cài các package về local để tạo máy ảo, khỏi phải download và tạo khi build image
# pmbootstrap chroot
~/# apk add abuild build-base ccache git devicepkg-dev mkbootimg postmarketos-base ccache-cross-symlinks gcc-aarch64 g++-aarch64 crossdirect ncurses-dev bash bc bison elfutils-dev flex gmp-dev installkernel linux-headers openssl-dev perl sed binutils-aarch64
# pmbootstrap --details-to-stdout install
*** SET LOGIN PASSWORD FOR: 'user' ***
(rootfs_asus-grouper-xfce4) % passwd user
New password: 147147
Retype new password: 147147
# pmbootstrap export
Image ở thư mục này: /home/[username]/.local/var/pmbootstrap/chroot_native/home/pmos/rootfs/asus-grouper.img
Boot ở đây: /home/[username]/.local/var/pmbootstrap/chroot_rootfs_asus_grouper/boot
Copy asus-grouper.img và boot.img đến /home/[username]
Trên nexus 7, đưa máy về bootloader giữ Volume Down + Power hoặc kết nối máy tính, mở Developer options → usb debug trong Android, gõ lệnh
$ sudo adb reboot bootloader
Trên PC/laptop, chuyển đến /home/[username], flash boot(các bước đều có thể fastboot flash và adb push trên windows)
$ sudo fastboot flash boot boot.img
Vào TWRP for grouper 3.3.1-0 trở lên https://dl.twrp.me/grouper/ trên nexus 7, chọn Advance → Terminal
Download TWRP for grouper
Download TWRP Open Recovery for grouper
dl.twrp.me
Dùng adb shell trên PC/laptop hoặc Advance/Terminal trong twrp để umount mmcblk0p9 (làm 2 lần cho chắc ăn) [với tilapia (bản 3G) là mmcblk0p10]
1. TWRP(Advance → Terminal): $ df
2. TWRP(Advance → Terminal): $ umount /dev/block/mmcblk0p__ <- fill partition number
3. TWRP(Advance → Terminal): $ umount /dev/block/mmcblk0p__ <- fill partition number
On PC/Laptop terminal:
$ adb push asus-grouper.img /dev/block/mmcblk0p__ <- fill partition number
- grouper has likely data on /dev/block/mmcblk0p9 but make sure!
- tilapia has likely data on /dev/block/mmcblk0p10 but make sure!
Install log file:
http://www.mediafire.com/file/znq1ijgnf8ygiey
https://pastebin.ubuntu.com/p/5G5FK6j328/
Install log file for Phosh trên Nexus 2012 8GB
http://www.mediafire.com/file/rl8sfc8jr83vnvr/file
Config sysctl.conf có sự chỉnh sửa theo KTweak trên github của tytydraco (xda-developers)
Tham khảo:
https://github.com/tytydraco/KTweak/tree/latency
File sysctl.conf đã chỉnh sửa
http://www.mediafire.com/file/j32igia3g02x8k6/sysctl.conf/file
Cpufreq:
http://www.mediafire.com/file/v65csn6d9gptit2/cpufreq.start/file
$ sudo nano /etc/sysctl.conf
# content of this file will override /etc/sysctl.d/*
vm.swappiness = 150
vm.vfs_cache_pressure = 100
vm.dirty_background_ratio = 5
vm.dirty_ratio = 15
#vm.dirty_background_bytes = 20971520
#vm.dirty_bytes = 41943040
vm.dirty_writeback_centisecs = 400
vm.dirty_expire_centisecs = 200
vm.lowmem_reserve_ratio = 32 32
vm.min_free_kbytes = 3072
vm.user_reserve_kbytes = 6144
vm.admin_reserve_kbytes = 3072
vm.panic_on_oom = 0
vm.overcommit_memory = 1
vm.overcommit_ratio = 50
vm.drop_caches = 3
vm.laptop_mode = 0
vm.mmap_min_addr = 4096
vm.oom_kill_allocating_task = 0
vm.extfrag_threshold = 500
vm.oom_dump_tasks = 1
vm.page-cluster = 1
vm.stat_interval = 1
vm.compact_unevictable_allowed = 0
vm.highmem_is_dirtyable = 0
kernel.panic = 10
kernel.panic_on_oops = 1
kernel.tainted = 0
kernel.ctrl-alt-del = 1
kernel.threads-max = 15507
kernel.random.write_wakeup_threshold = 128
kernel.usermodehelper.bset = 4294967295 4294967295
kernel.usermodehelper.inheritable = 4294967295 4294967295
kernel.printk = 4 4 1 7
kernel.kptr_restrict = 2
kernel.randomize_va_space = 2
kernel.perf_event_paranoid = 3
kernel.keys.root_maxkeys = 200
kernel.keys.root_maxbytes = 20000
kernel.perf_event_paranoid = 1
kernel.perf_cpu_time_max_percent = 3
kernel.shmmax = 268435456
kernel.shmall = 2097152
kernel.msgmni = 2048
kernel.msgmax = 64000
kernel.sem = 500 512000 64 2048
kernel.auto_msgmni = 1
kernel.sched_child_runs_first = 0
kernel.hung_task_timeout_secs = 0
fs.file-max = 99222
fs.epoll.max_user_watches = 138922
net.core.somaxconn = 128
net.core.wmem_max = 131072
net.core.rmem_max = 131072
net.core.wmem_default = 112640
net.core.rmem_default = 112640
net.core.warnings = 1
net.ipv4.tcp_ecn = 1
net.ipv4.tcp_fastopen = 3
net.ipv4.tcp_timestamps = 0
net.ipv4.tcp_tw_reuse = 1
net.ipv4.tcp_wmem = 1536 21845 131072
net.ipv4.tcp_rmem = 1536 21845 131072
$ sudo sysctl -p
$ sudo nano /etc/local.d/cpufreq.start
# Set the governor to ondemand for all processors
for cpu in /sys/devices/system/cpu/cpufreq/policy*; do
echo ondemand > ${cpu}/scaling_governor
done
# Reduce the boost ignore_nice_load to 0
echo 0 > /sys/devices/system/cpu/cpufreq/ondemand/ignore_nice_load
# Reduce the boost io_is_busy to 0
echo 0 > /sys/devices/system/cpu/cpufreq/ondemand/io_is_busy
# Reduce the boost powersave_bias to 0 <-- tăng giảm xung của cpu/gpu
echo 0 > /sys/devices/system/cpu/cpufreq/ondemand/powersave_bias
# Reduce the boost sampling_down_factor to 2
echo 2 > /sys/devices/system/cpu/cpufreq/ondemand/sampling_down_factor
# Reduce the boost sampling_rate to 20000
echo 20000 > /sys/devices/system/cpu/cpufreq/ondemand/sampling_rate
# Reduce the boost threshold to 95%
echo 95 > /sys/devices/system/cpu/cpufreq/ondemand/up_threshold
$ sudo chmod +x /etc/local.d/cpufreq.start
$ sudo rc-update add local default
$ sudo lbu commit
***Tooltips:
Install 2D GPU accelerate driver:
$ sudo apk add xf86-video-opentegra libvdpau-tegra
Change opentegra.conf to 00-opentegra.conf in /usr/share/X11/xorg.conf.d
Let's opentegra driver loaded before fbdev driver
https://wiki.alpinelinux.org/wiki/Desktop-notes
Setting up Alsa audio
- apk add alsa-utils
- rc-update add alsa
- rc-service alsa start
- Set the default sound device
- List sound devices: cat /proc/asound/card*/id
- Depending on your setup select the proper device
- create a /etc/asound.conf with following content where PCH is sound card name.
type plug
slave.pcm {
@func getenv
vars [ ALSAPCM ]
default "hw:ALC5642"
}
}
Vào terminal:
$ alsamixer -c 0
Enable các thông số thiết lập (phím M hoặc phím mũi tên lên/xuống): "Speaker R" "Speaker L"
"DAC MIXR INF1" "DAC MIXL INF1" "SPOL MIX DAC R1" "SPOL MIX DAC L1" "Stereo DAC
MIXR DAC R1" "Stereo DAC MIXL DAC L1"
Cài timezone
$ sudo apk add tzdata
$ ls /usr/share/zoneinfo
Suppose you want to use Asia/Ho_Chi_Minh. First copy the proper zone to local
$ sudo cp /usr/share/zoneinfo/Asia/Ho_Chi_Minh /etc/local
$ sudo echo "Asia/Ho_Chi_Minh" > /etc/timezone
User-agent:
$ gsettings set org.gnome.Epiphany.web:/org.gnome.epiphany/web/ user-agent 'Mozilla/5.0 (Android 11; Mobile; rv:91.0) Gecko/91.0 Firefox/91.0'
Ẩn con trỏ chuột trong xfce4
$ sudo nano /etc/lightdm/lightdm.conf
Bỏ dấu '#' trong [:Seat]
xserver-command=X -nocursor
Cài ibus và bộ gõ Vietnamese
$ sudo apk add ibus
Chọn thêm input language là Vietnamese. Đồng thời tạo settings → session and startup
Name: IBus
Description: input keyboard methods
Command: /usr/bin/ibus-daemon -d
start: on logon
Fix error: (1) not authorized to control networking
https://wiki.gentoo.org/wiki/NetworkManager#Fixing_nm-applet_insufficient_privileges
Fixing nm-applet insufficient privileges
If nm-applet fails to create new networks with the error "Insufficient Privileges," then it could be a policy kit issue. Create the following file:FILE: /etc/polkit-1/rules.d/50-org.freedesktop.NetworkManager.rules
polkit.addRule(function(action, subject) {
if (action.id.indexOf("org.freedesktop.NetworkManager.") == 0 && subject.isInGroup("plugdev")) { return polkit.Result.YES;
}
});
This lets all users in the plugdev group control network manager.
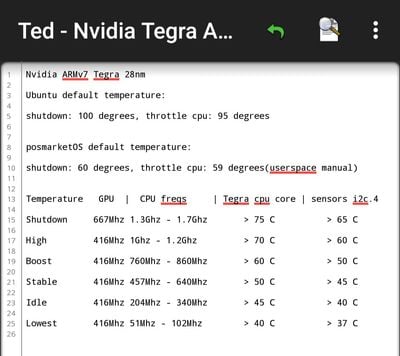
Control CPU frequency match with thermal, using shell scripts
https://github.com/Sepero/temp-throttle/tree/4e6fa06ea036129c4a815fc5d4494556578624e
Low_temp=max_temp - 5
$ sh temp_throttle.sh 59
https://www.mediafire.com/file/7vh0qxu1r28aeia/
Create startup temperature for cpu throttle at login
$ visudo
ALL ALL=(root) NOPASSWD: /path/to/temp_throttle.sh
$ sudo chown root /path/to/temp_throttle.sh
$ sudo chmod 755 /path/to/themp_throttle.sh
Settings → Sessions and applications startup
Command: sudo /path/to/temp_throttle.sh 58
Activate sensor auto rotate screen:
https://gitlab.com/gullradriel/asus-grouper-nexus-7-sensor-daemon
$ sudo apk iio-sensor-proxy perl xinput xrandr xset
$ sudo rc-service -v iio-sensor-proxy start
$ sudo rc-update add iio-sensor-proxy default
$ sudo monitor-sensor
Check all program allow running permission and run
$ sudo /usr/init.d/asus_grouper_sensors start
$ sudo rc-update add asus_grouper_sensors default
***Connecting keyboard and mouse bluetooth, NFC checking:
$ sudo apk bluez bluez-utils bluez-mgmt bluez-btmon bluez-hid2hci bluez-alsa neard
$ sudo rc-service -v bluetooth start
$ sudo bluetoothctl power on
$ sudo bluetoothctl
#<bluetoothctl>: scan on
#<bluetoothctl>: help
NFC:
$ sudo rc-service -v neard start
$ sudo nfctool -d nfc0 -1 -p
***Config firefox 90, install Ublock origin and h264ify addons
$ sudo apk add zram-init
https://gitlab.com/postmarketOS/mobile-config-firefox/blob/master/src/mobile-config-prefs.js
Cài dual boot Android và Ubuntu dùng MultiROM
https://tinhte.vn/thread/multirom-cai-ubuntu-14-04-6-lts-len-nexus-7-2012-grouper-dualboot-android.3134764/